Step 2: The Layer
![]()
![]()
![]()
Step 2: The Layer
![]()
![]()
![]()
|
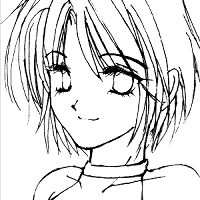
This section explains how to use layers for putting colors onto a drawing. This is a simple one-sheet picture. |
|
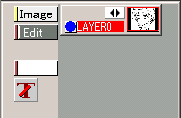
The newly made canvas and a file that is opened consists of only one layer: [LAYER0]. Adding layers make "LAYER1", "LAYER2" and so on, but the more layers you make the harder you can tell which layer has what information. Let's rename them with appropriate ones. |
|
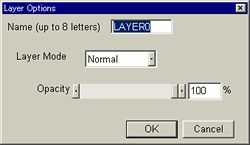
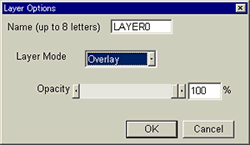
Click on [LAYER0] in the L-panel, and [Layer Options] pops out. You can also get the same dialog by clicking [Edit]-[setting] in the top menu. Here you can change the name. I renamed it to "line" but you use your own names that can be easily recognized. |
|
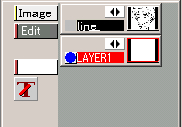
Let's make a new layer for putting colors. Click [Edit]-[Add...] in the L-panel. In the pop-up dialog, click "OK" with the size option unchanged as[Full Size]. Then, [LAYER1] gets newly added. I renamed the layer to "paint" as I liked. |

|
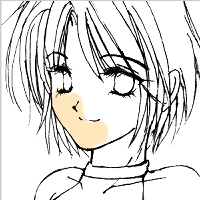
Please note that the red highlighted layer in the L-panel is the layer that you are currently working on. Make sure that "paint" layer is highlighted, and put the skin color onto the picture. Again, the black outline seems to have been erased, but the line information is actually maintained underneath. Let's change the layer mode in [Layer options], and you will see the proof. |
|
Let's choose [Overlay] here in the pull-down menu of [Layer Mode]. [Overlay] is the way that mixes two layer information. |
|
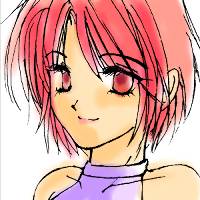
Now you get to see the face outlines, with two layer information mixed. As you see, putting a color onto another layer does not influence information on other layers. It is just like putting a transparent plastic sheet onto a picture and paint on the sheet. This is the basic concept of the Layer function. |

|
I put the color on all skin part. |

|
Click on In the sample I clicked |

|
I made the "line" layer invisible and "paint" layer visible. The part other than skin color looks white, but it is actually transparent.
In "tutorial step1", I explained "The background of a newly made picture
or a captured image by a scanner is filled with "white."
but added layers are transparent. (This is Isao's concept; the
first sheet is a blank white sheet of paper, and added layers are transparent
plastic sheets.) |
|
|
Next, I would like to put some shadow onto the skin, but if I work on the same "paint" layer, make a mistake and would like to erase it, it will erase the base skin color, too, so let's add another layer for shadow. |

|
Just like before, Click [Edit]-[add...] in the L-panel and add [LAYER2]. In the [Layer Option] change the layer mode to [Overlay] and change the name to [paint2]. I painted shadow on the [paint2] layer. |
|
This time, I added two layers; the paint layer for the base skin color and the paint2 layer for shadow. You can add more layers for colors of eyes, hair, shadow in the hair, but the more layers you use, the more memory the PC consumes. Using too many layers might make the speed of PC unacceptably slow. There is a limitation of the number of layers you can use on your machine. When everything is done, merge layers to one sheet (layer). In the top menu, click [Image]-[Merge layers]. Click OK button and the layers will merge and you will get a flatten image that can be saved as Windows Bitmap (.bmp). (You will get an unexpected result if you save the picture in BMP format without merging layers, so be careful. I will explain in the next section.) |